Reading Piano Sheet Music

When I first got my fingers on the piano, I didn’t even bother trying to read sheet music. The first song I played was “happy birthday”. I first learned songs by ear and looked up YouTube tutorials on how to play songs, such as Fur Elise.

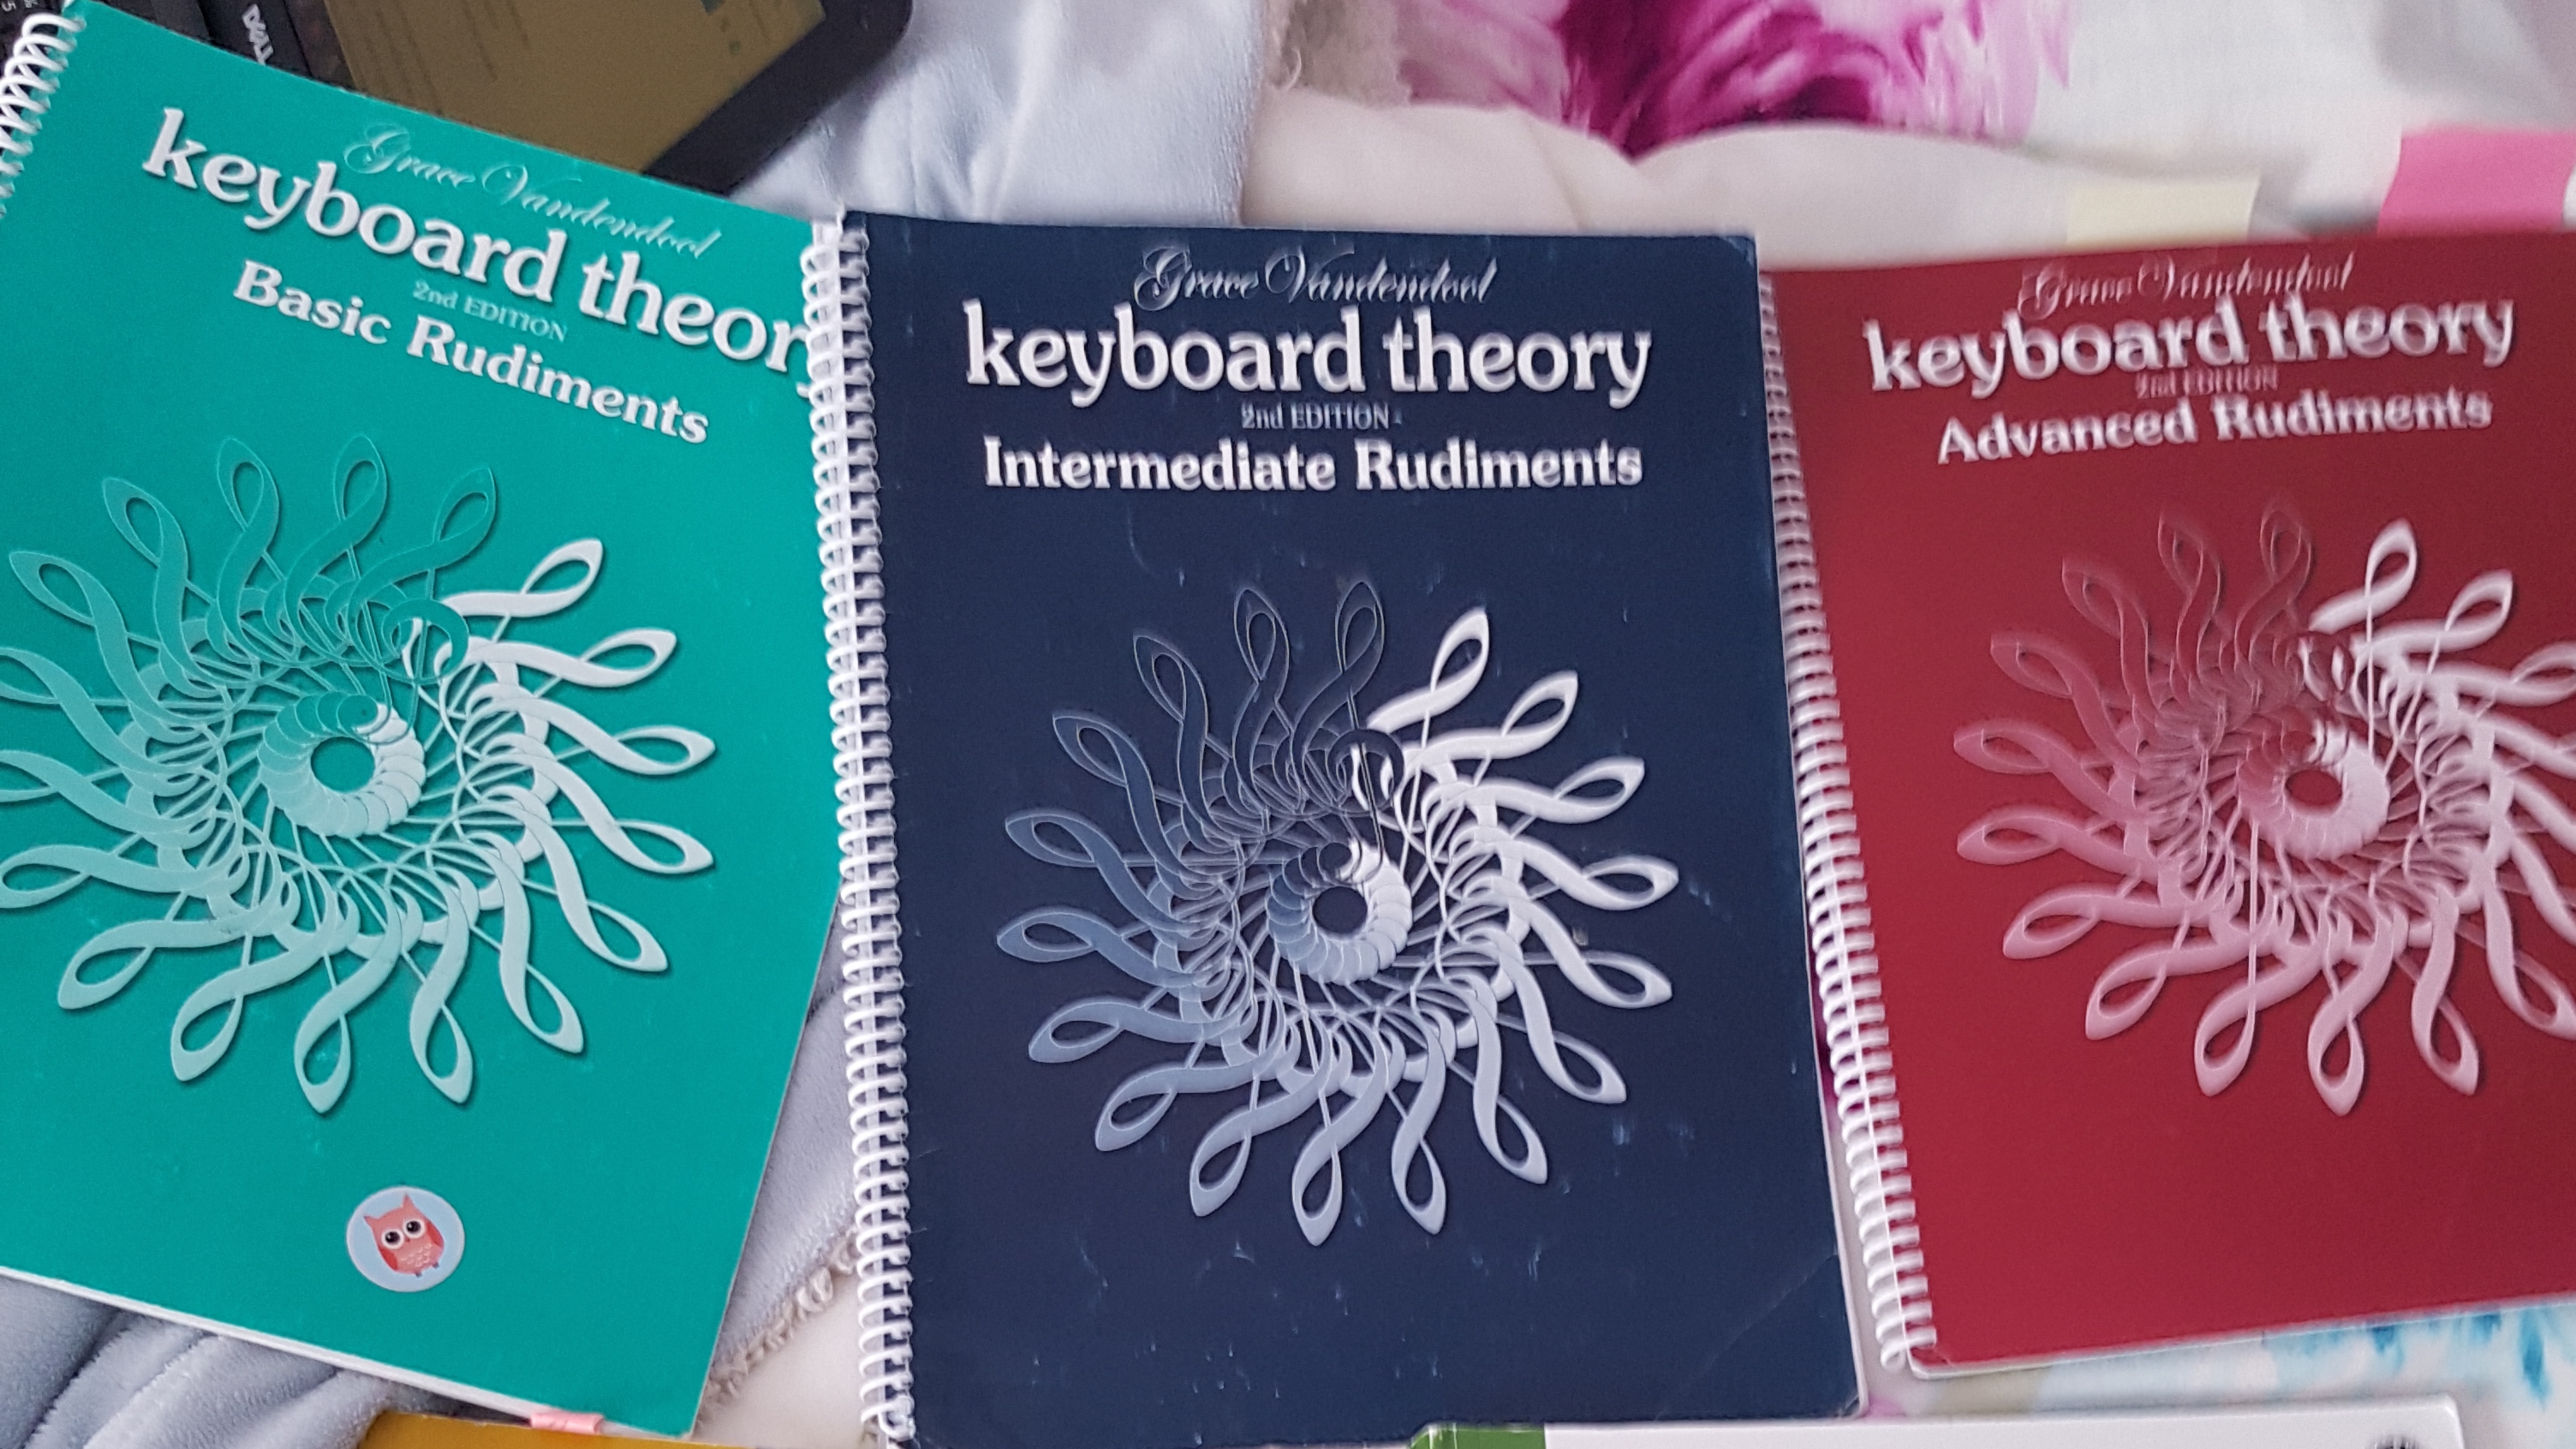
Learning how to read sheet music was be hard at first, but after lots of practice, reading sheet music is something I could do in my sleep. There are many tips I have learned throughout the years and I am willing to share them with you guys!

The Grand Staff

A staff is a set of 5 horizontal lines and four spaces. In musical notation, the staff represents different pitches, called notes.

The grand staff is a set of two staffs connected with a bracket that play together at the same time. It is often used for keyboard instruments such as the piano.

Note Reading

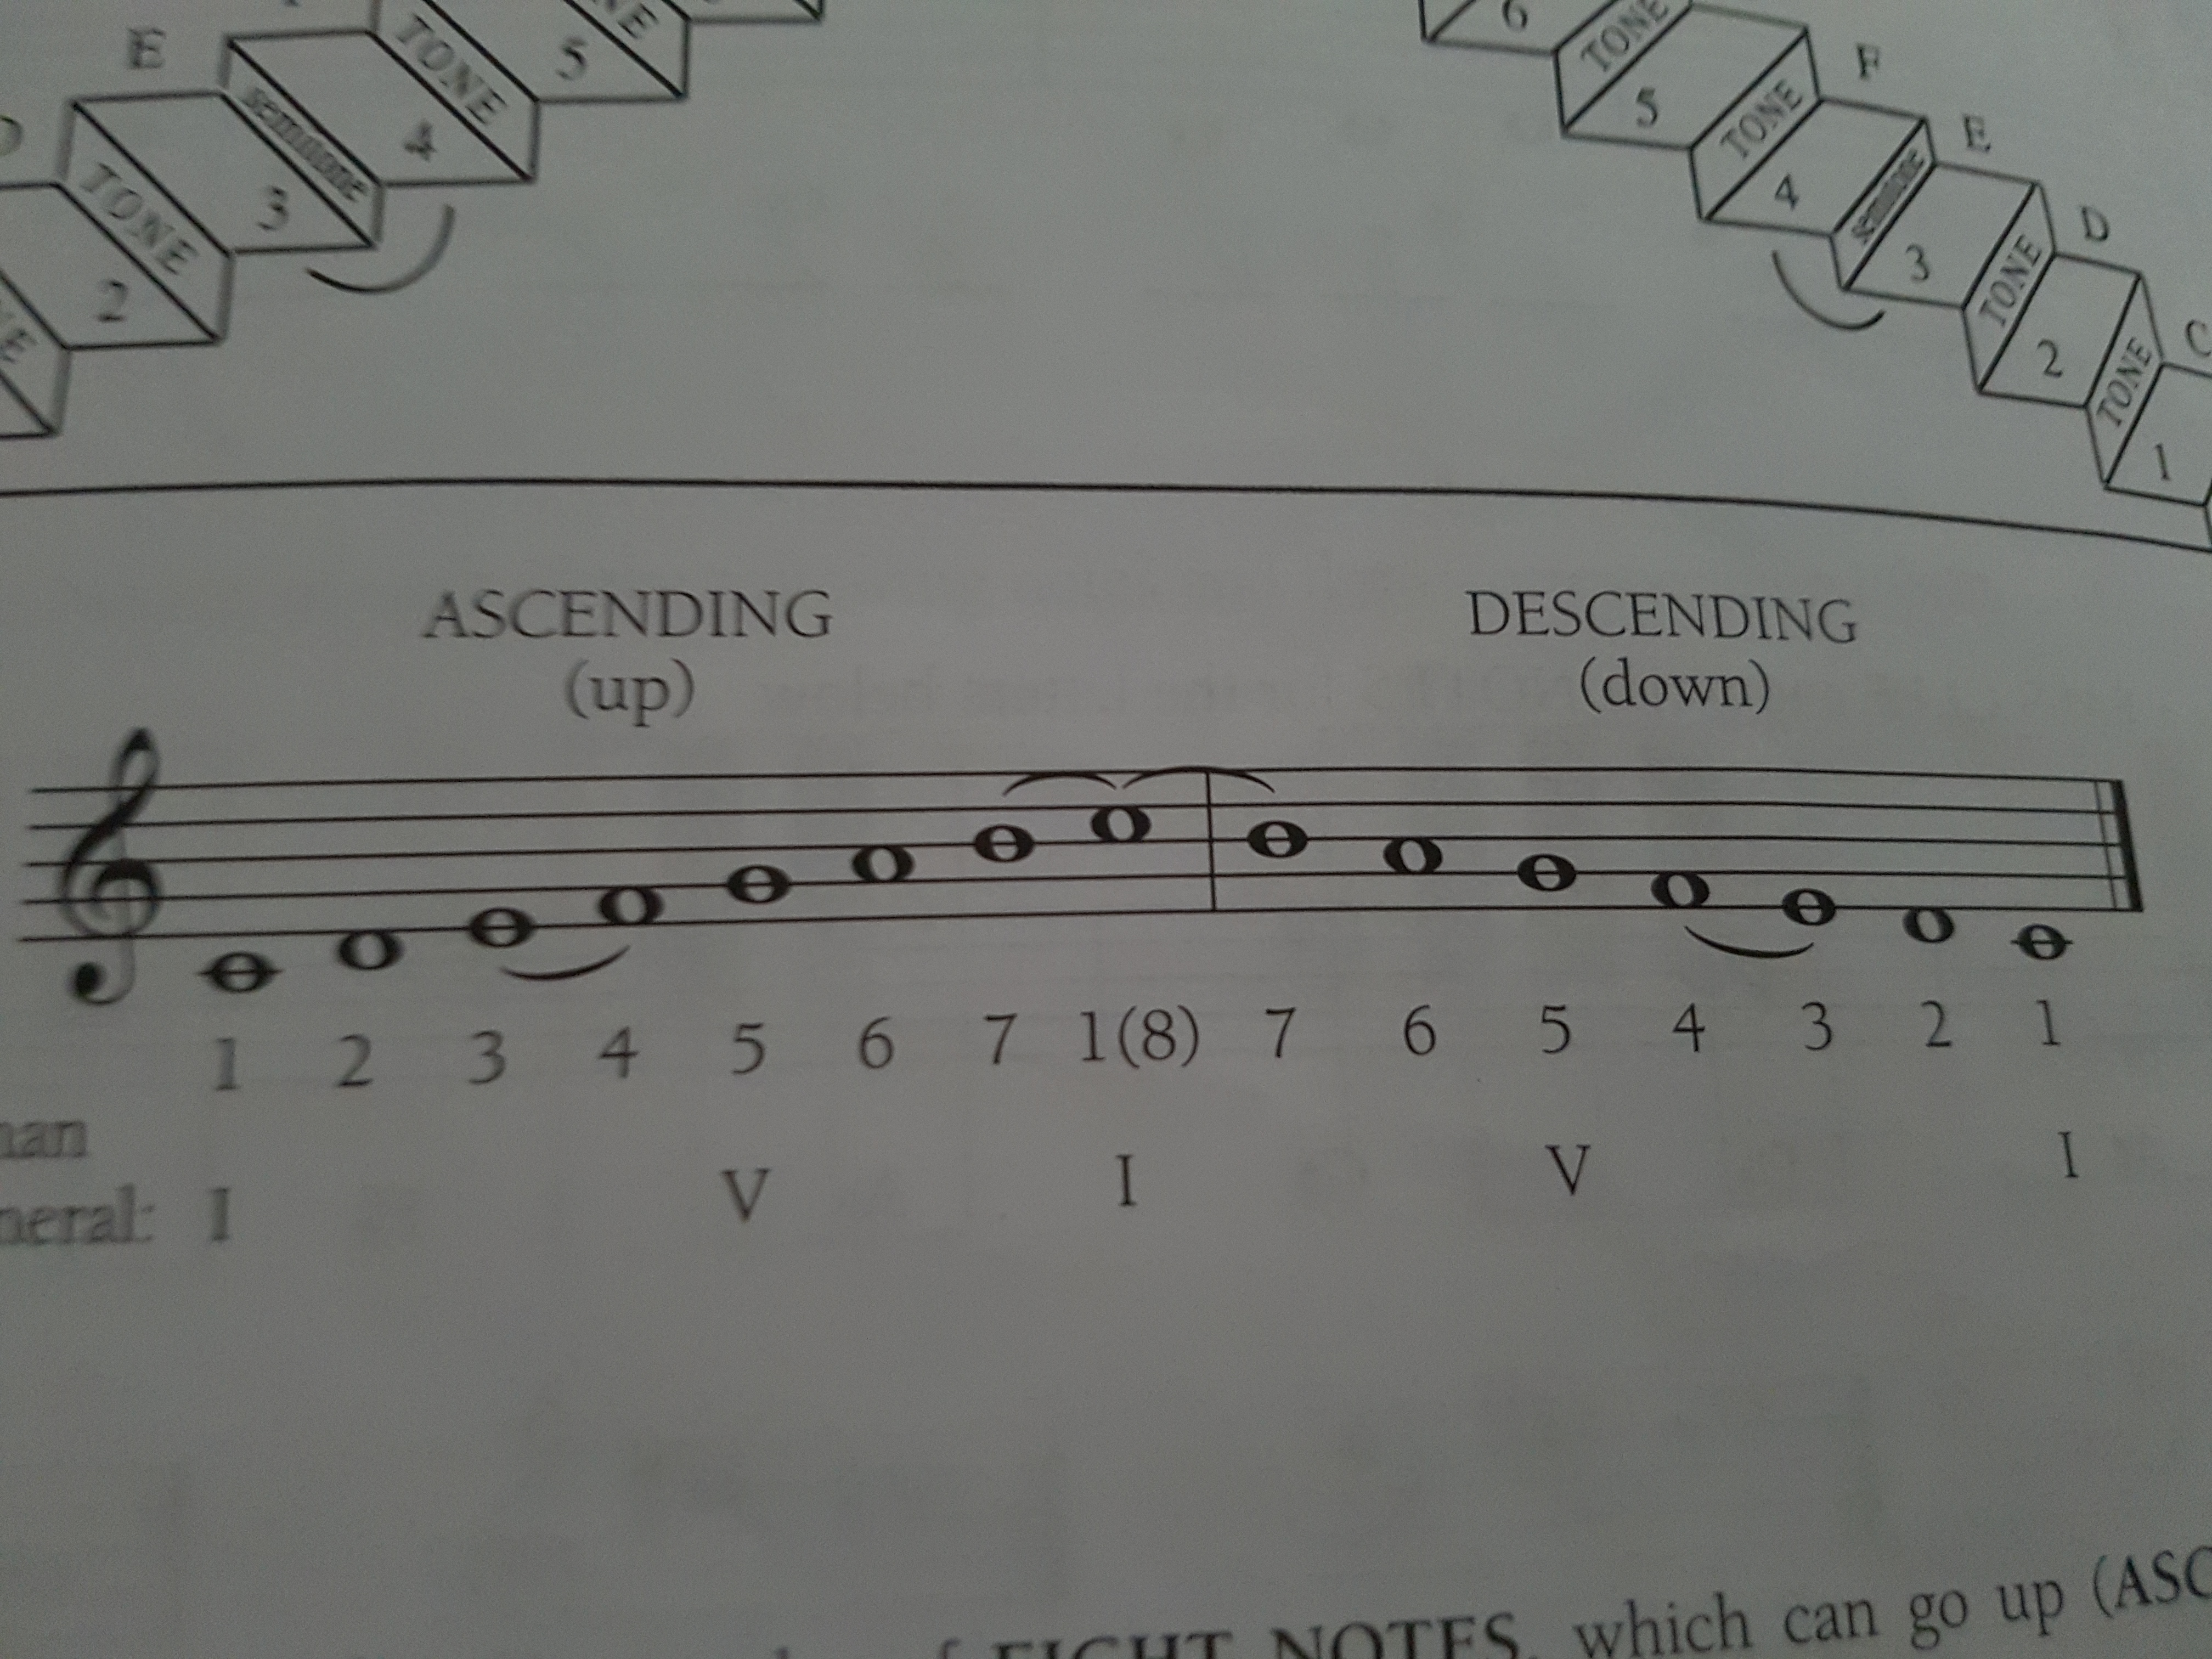
I learned as a kid that trying to read sheet music seems to have two sections. One part is looking at the sheet and identifying the notes, but the other part find them on the keyboard. First thing is to first identify notes.

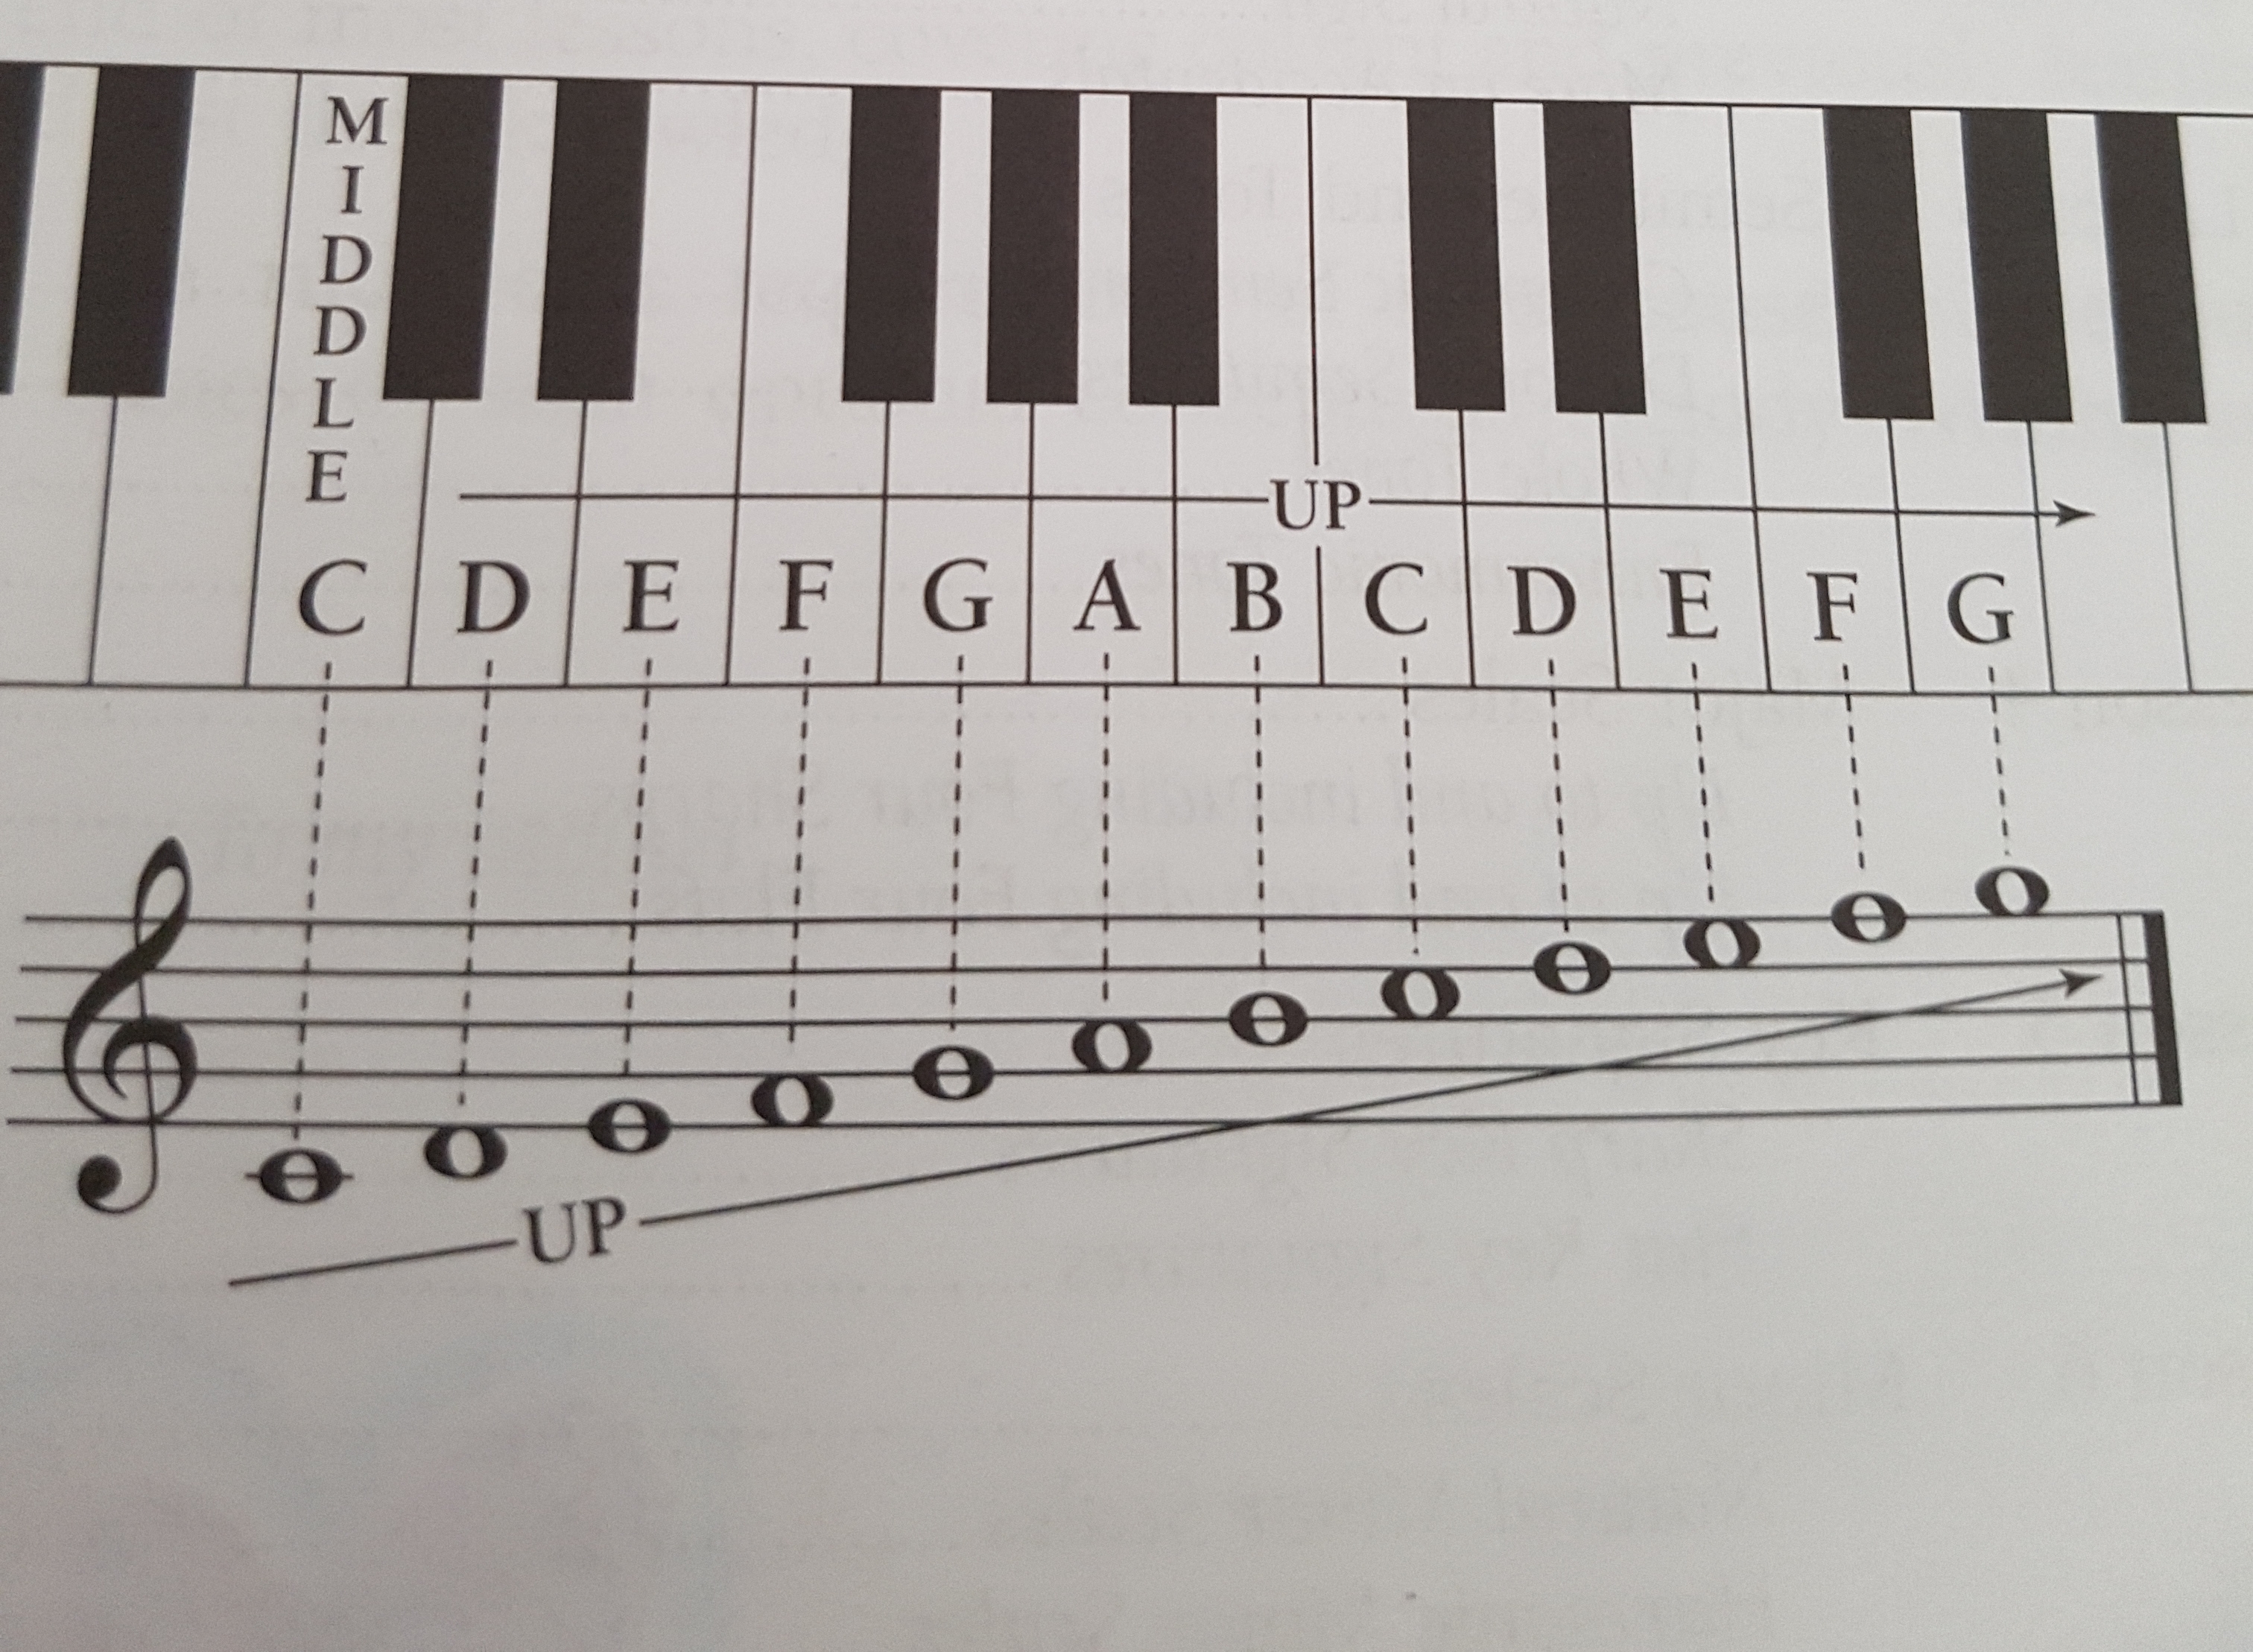
In music, we use 7 letters of the alphabet, ABCDEFG. We use ABCDEFG to represent each note. Each pitch or key is a letter, either ABCDEFG. Since the piano has lots of keys, we repeat the alphabet.

The alphabet repeats endlessly. I always use middle C to guide my note naming.

Each place on the staff represents a note and a letter. I use sayings to help memorize which place on the staff is each note.

For the notes under and above the staff, we use something called “ledger lines”. I go up or down the scale, usually counting up or down from the lines of staff.

Clefs

In music, the symbol placed at the beginning of a staff is called a clef. Its purpose is to tell the player the pitch of the notes on the staff.

The piano always use these 2 clefs: treble and bass.

The Treble Clef

The treble clef.

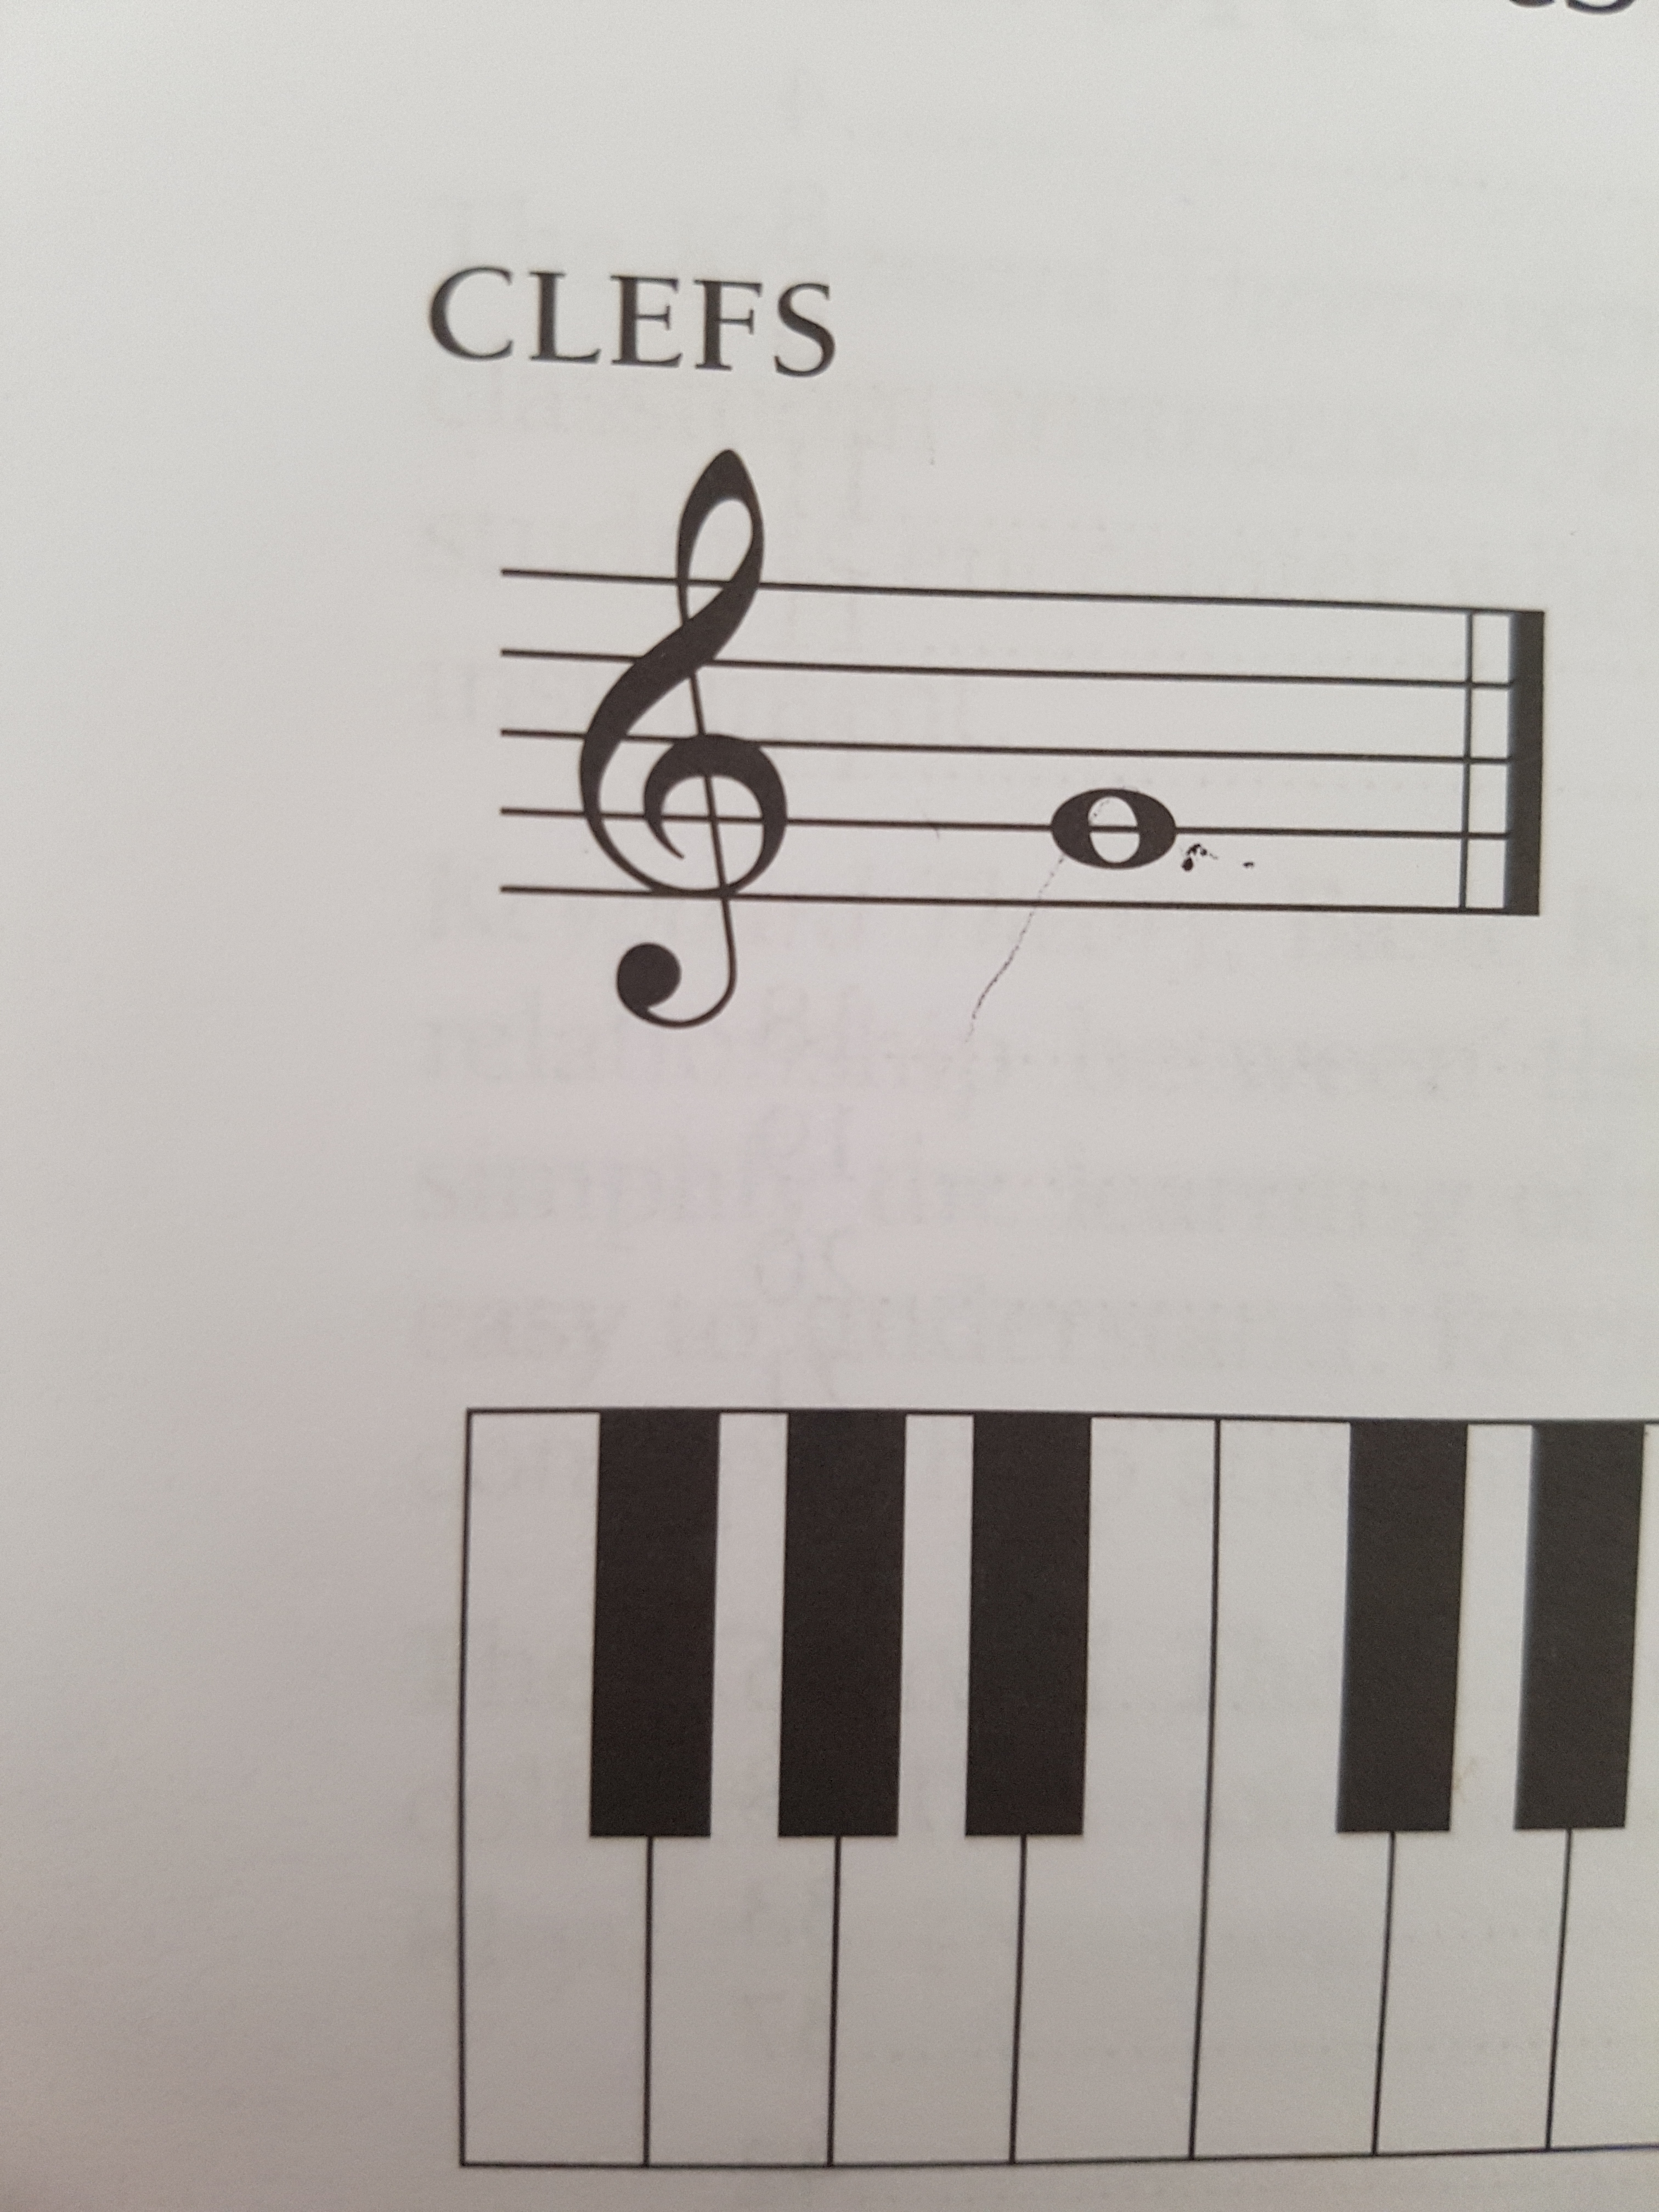
The treble clef is usually for the notes higher than middle C and is often the clef for the right hand. Another name for the treble clef is the G clef.

For the lines in the treble clef I use (E)very (G)ood (B)oy (D)eserves (F)udge. For spaces, I use FACE.

The Bass Clef

The bass clef.

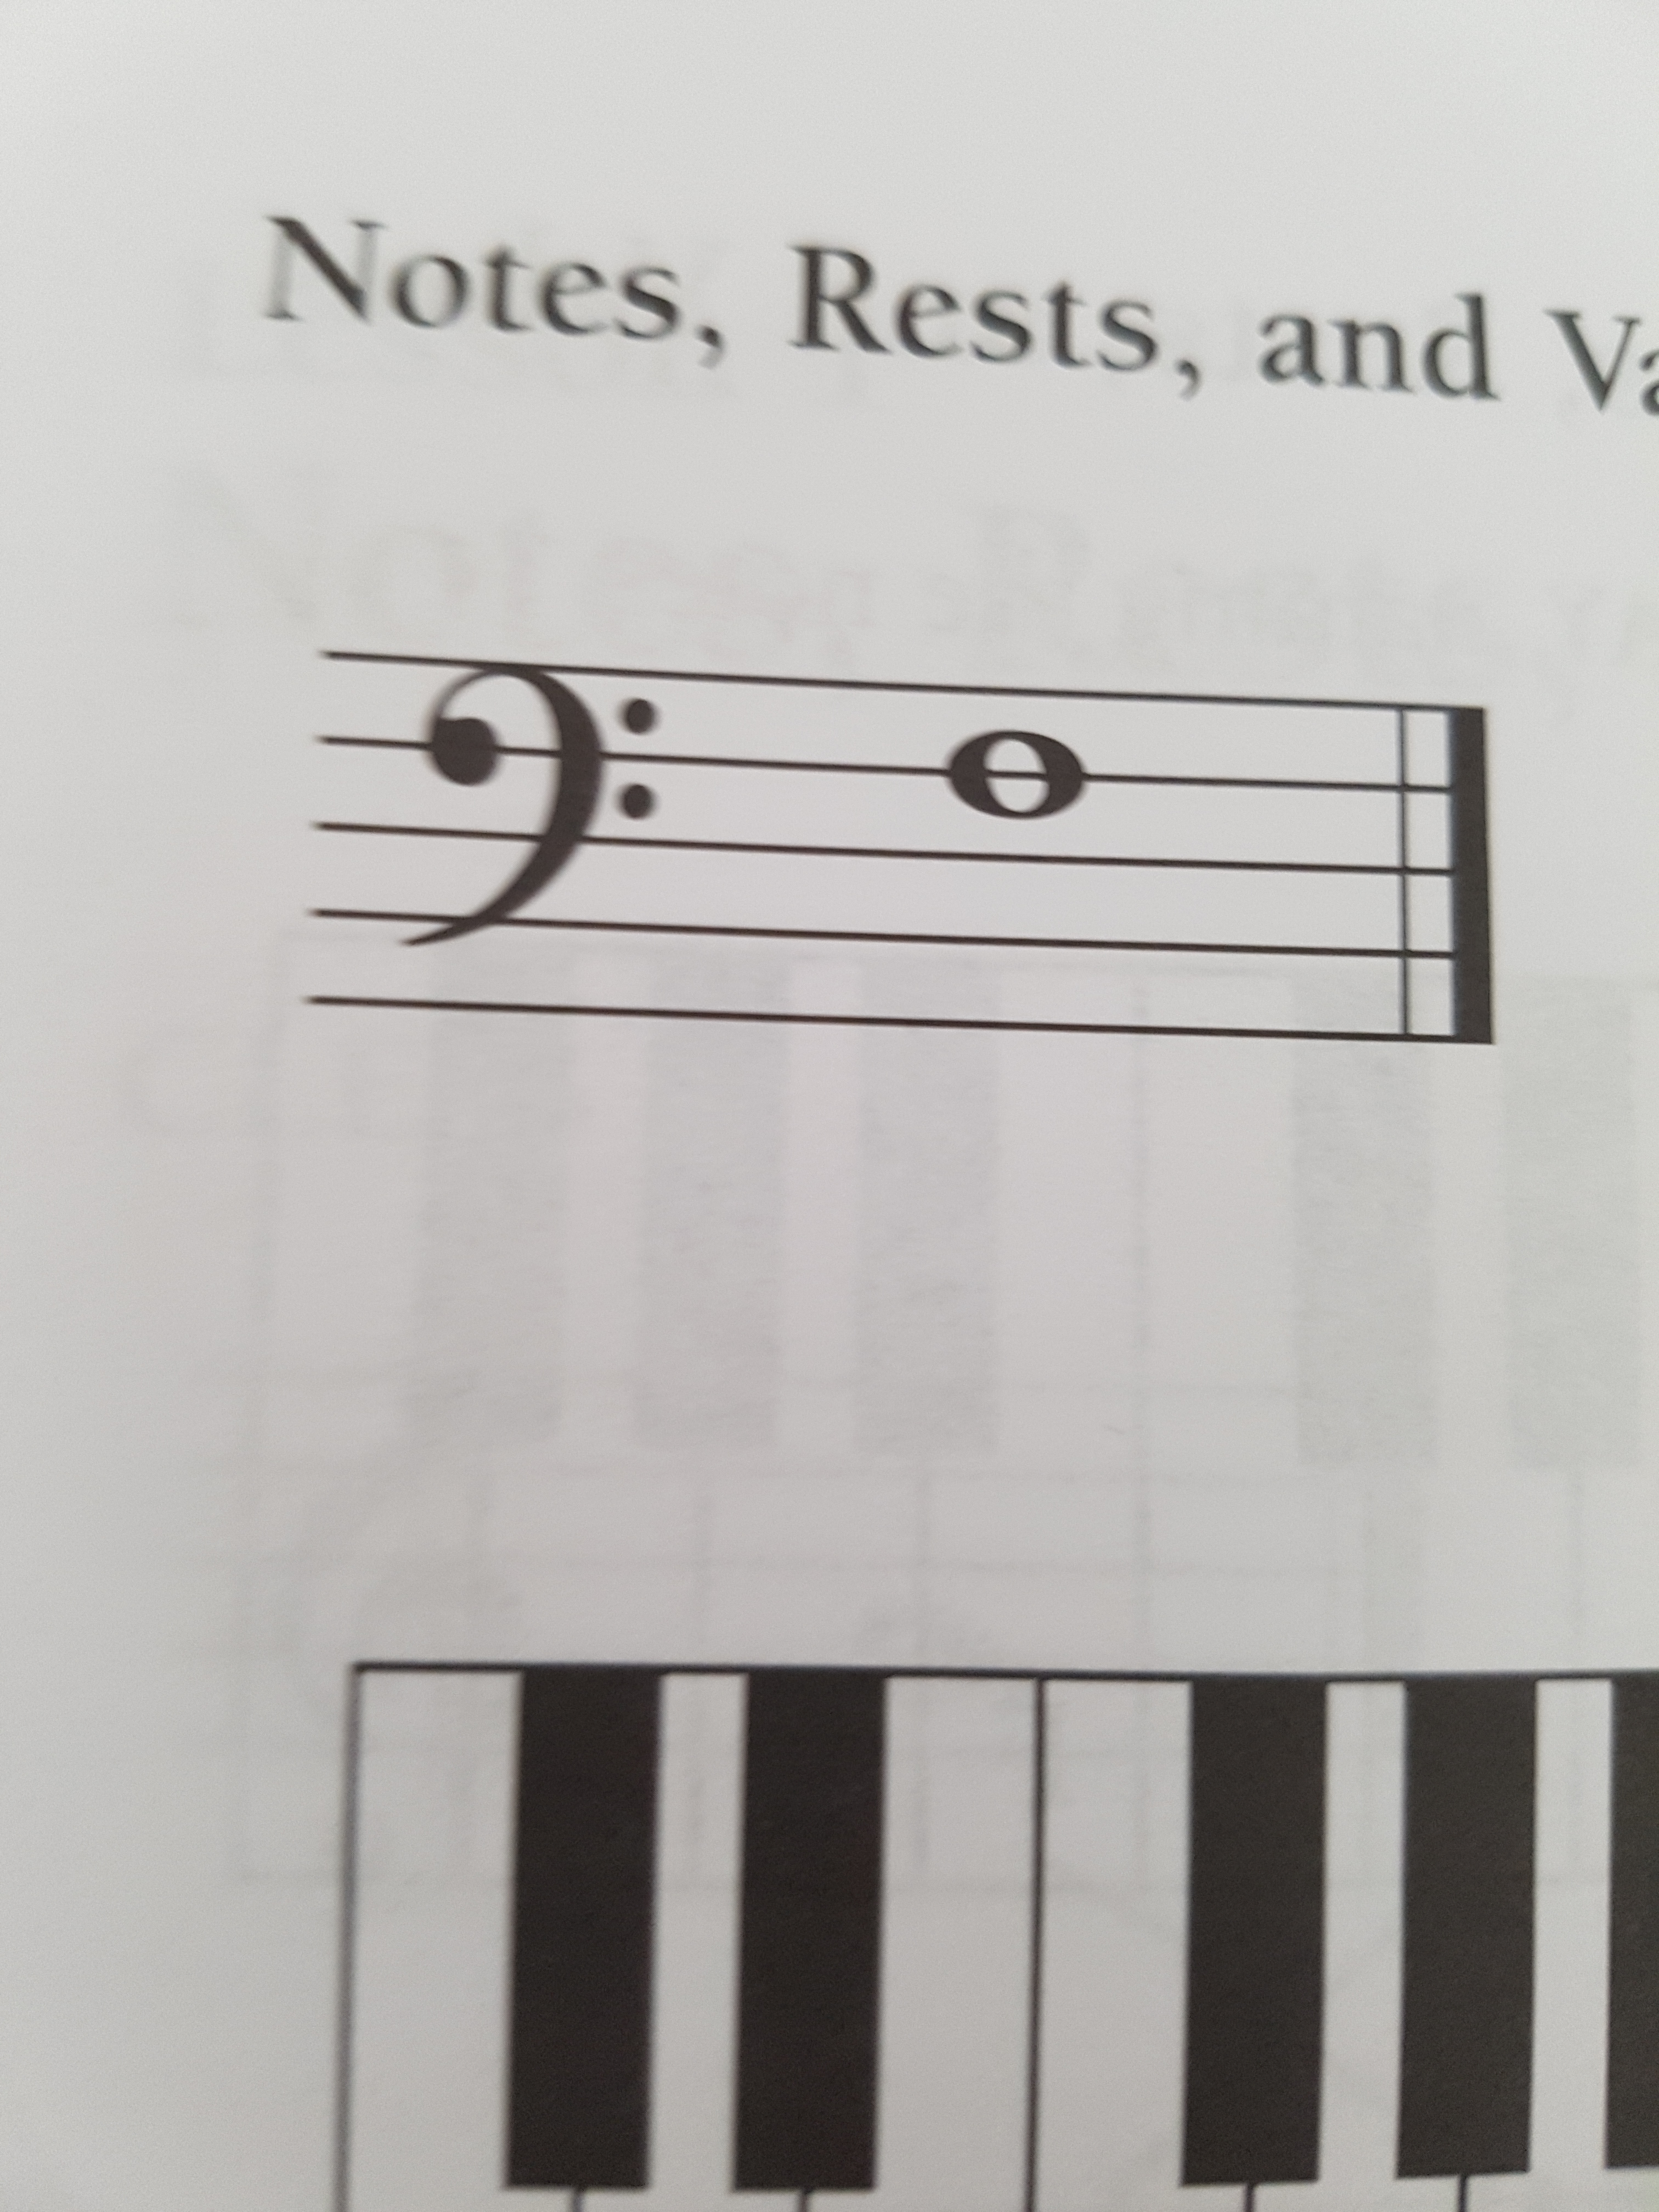
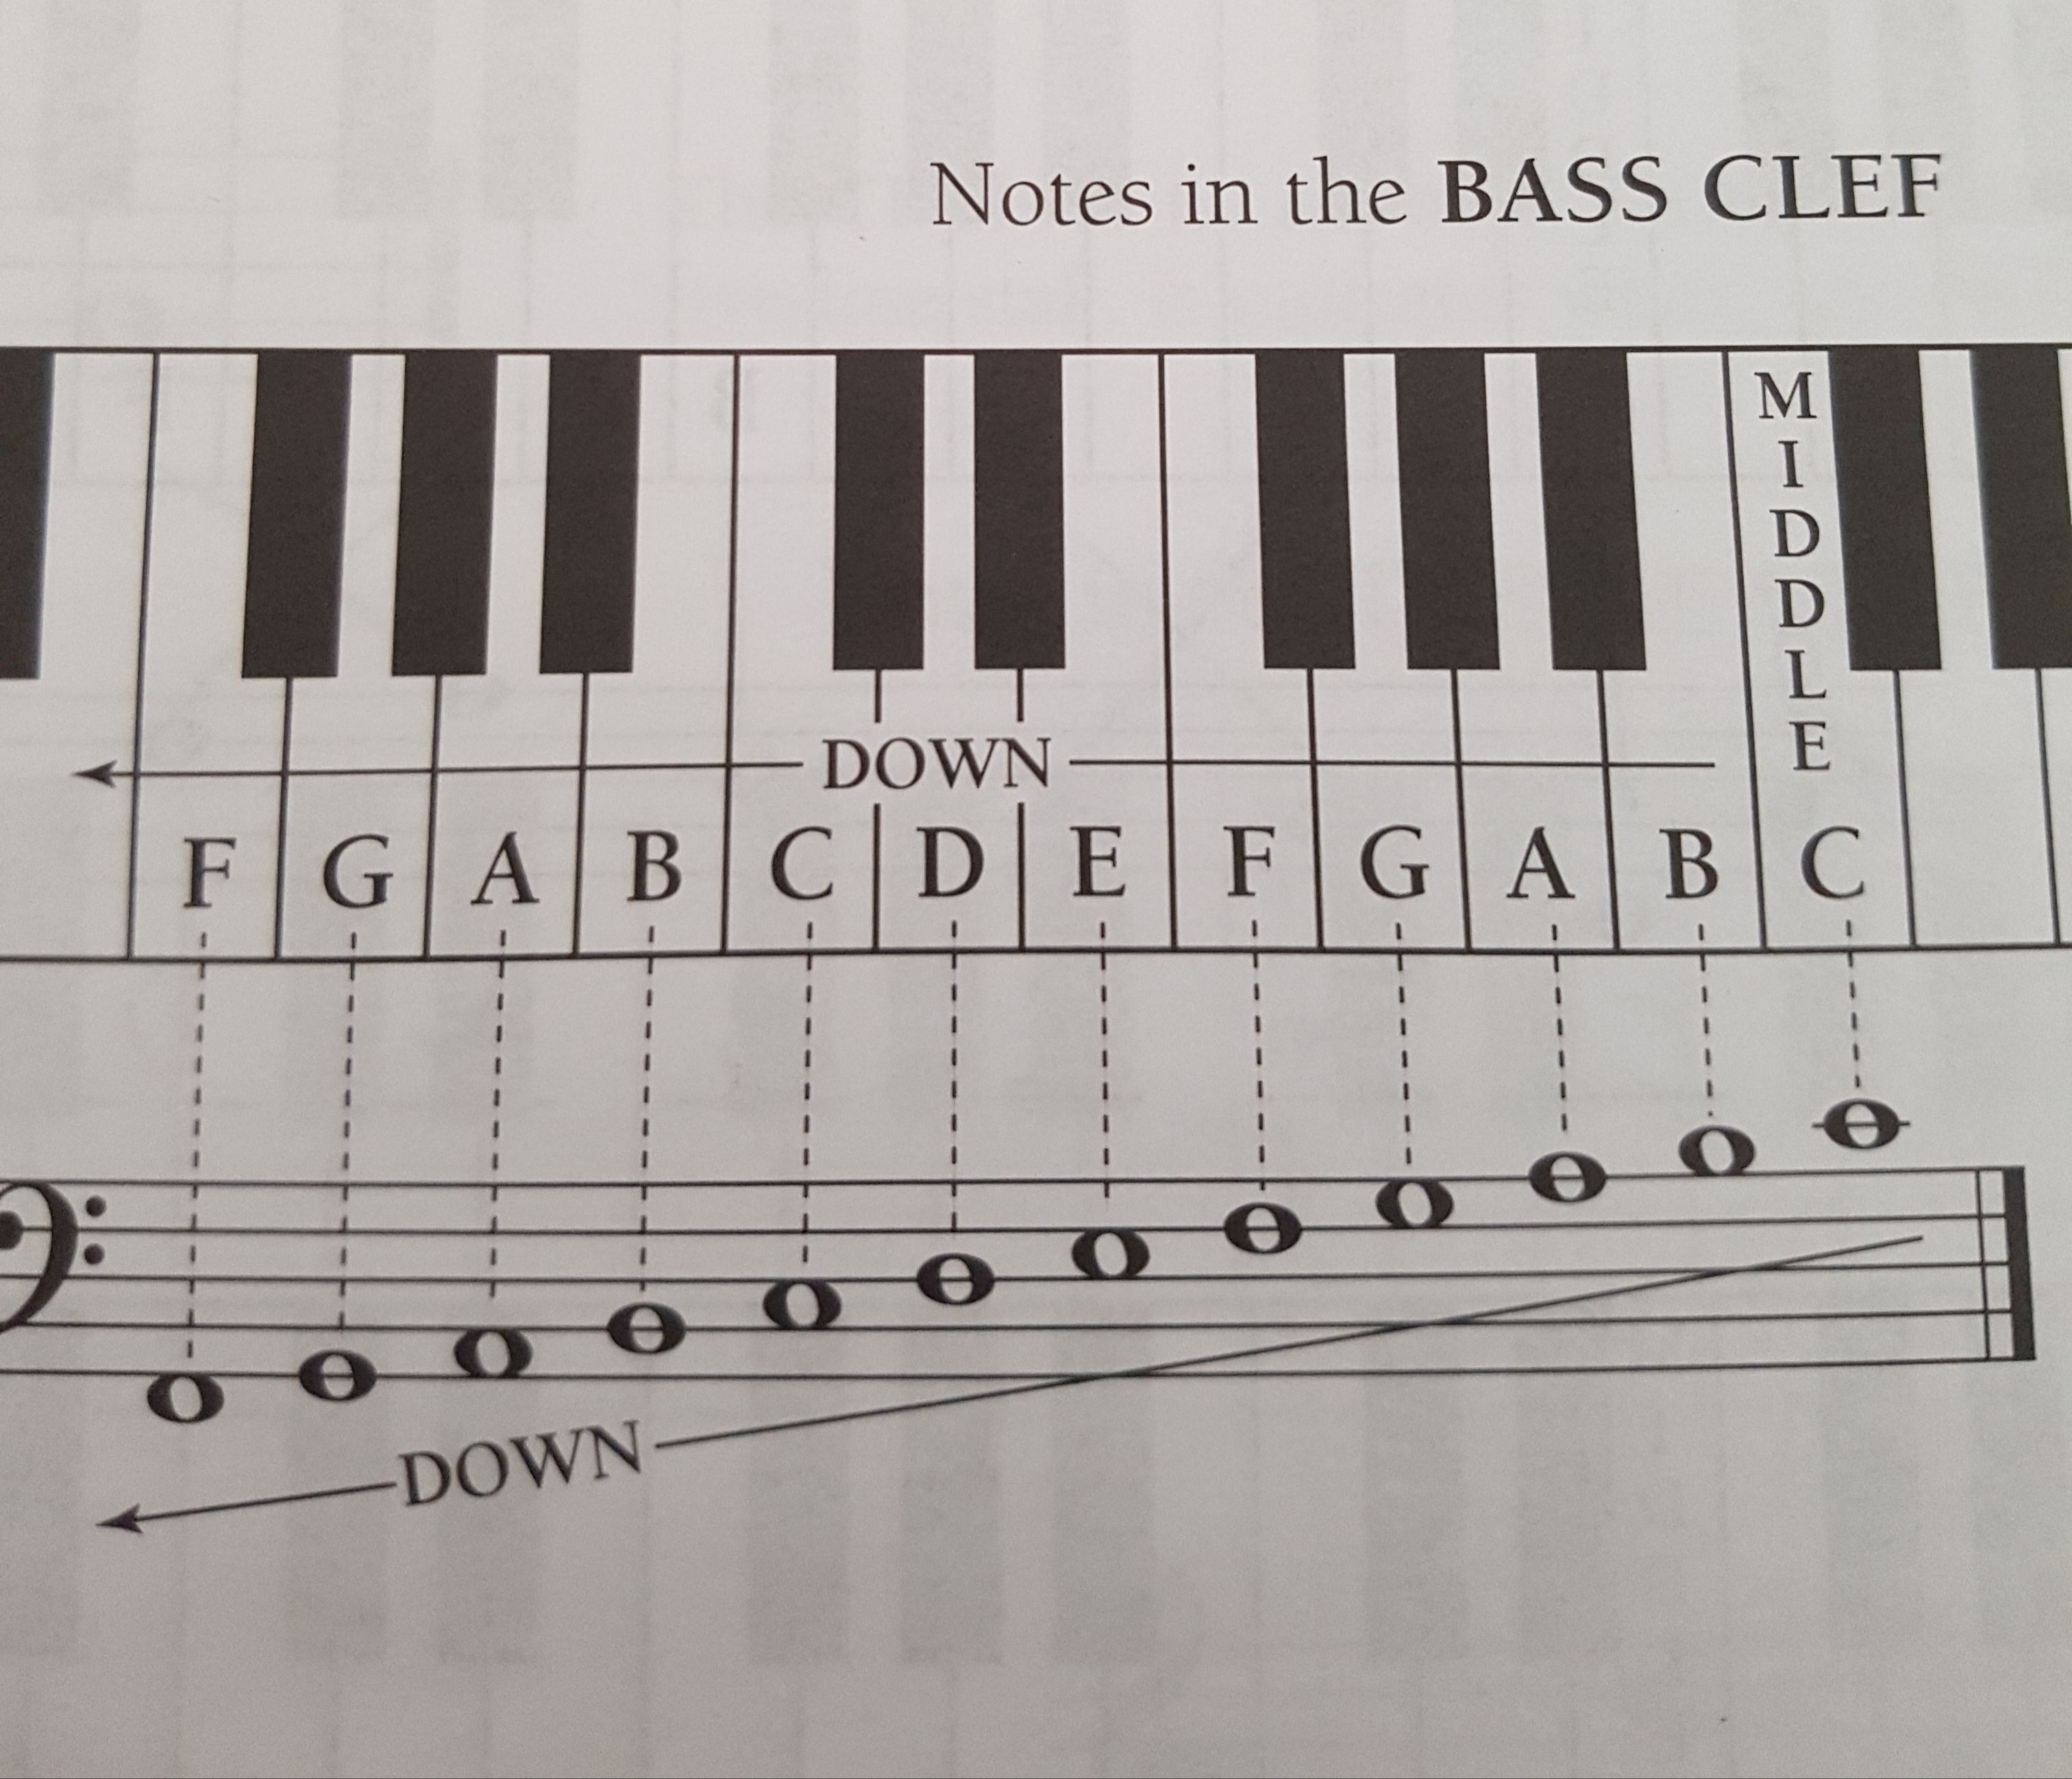
The bass clef is usually for the notes lower than middle C and is often the clef for the left hand. Another name for the bass clef is the F clef. A trick I use to remember this is that the two dots on the right is surrounding the line F.

For the lines, I use the saying (G)ood (B)oys (D)eserve (F)udge (A)lways. You can also use (G)reat (B)ig (D)ucks (F)ly (A)way. For spaces, I use (A)ll (C)ows (E)at (G)rass.

You can find each of the notes of the staff using the “guide note” middle C and going up (if the note is higher than C) or moving down. (lower than middle C) Middle C on the staff is the first ledger line below the staff on the treble clef. On the bass clef, it is the first ledger line above the staff.

Playing the Grand Staff

When I talk to people who don’t play the piano, I usually get asked:

How do you read both hands at once? Or how do you keep track of which hand plays what?

This is one of the pianist’s toughest challenges. Most instruments require that you will only learn one clef, however since pianos are capable of making sounds with both hands, you have to read two lines of staff.

Perhaps the issue people have here is that they are constantly trying to do too much too quickly. At their level, they try to read music that is far too difficult to process. I’ve done it myself and I have seen it all during teaching.

When I first started playing, I got frustrated. Indeed the piece I was learning were readable hands separately, though playing it hands together became a burden.

So then, even at a painstakingly slow pace, I read one note at a time, “slicing” the piece together.

This really helped me learn songs and play hands together. Playing the song line by line or measure by measure made my playing improve significantly.

Reading sheet music is very important when learning new songs and everything in music takes practice and hard work. Thanks for reading my blog!

Dynamics on the Piano and Flute

“dy·nam·ics
/dīˈnamiks/

noun

The varying levels of volume of sound in different parts of a musical performance.”

Google

When I first started playing the piano and the flute, I noticed that I could increase and decrease the volume of a note depending on how I played it. One thing I learned as a kid is that dynamics play a significant role in songs.

Dynamics help convey the song’s and composer’s emotions and expressions. Take an example like the Star Wars song. It is often played at a very loud volume because the composer, John Williams, wanted the audience to feel excited. The dynamics of the song makes Star Wars seem powerful and brave, not weak and timid.

In my experience, learning to play dynamics effectively takes time and plenty of experimentation.

I tried to make this guide as helpful as possible while also acknowledging the fact that you won’t be a dynamic master five minutes after reading this blog.

With that in mind, let’s get started!

The Basics

Before playing and learning how to play dynamics, you need to know the basic foundations.

Dynamics refers to the volume of the music that should be played. They are shown in letters which stand for Italian words in dynamic levels.

On sheet music, there are signs indicating what kind of dynamic you need to play. Here is a chart below of the basic dynamics you might run into.

Other dynamic markings would be the crescendo and decrescendo. It can be indicated in cursive words or < and >. A crescendo means gradually louder, and decrescendo is the opposite. It gets gradually softer.

If you are playing music that has a p and later an f, that’s implying an abrupt change. You’re going from quiet to loud with little to no transition. It is the same with f to p.

If there is a crescendo or decrescendo, there is a transition. For example, if there was a decrescendo from f to p, the melody would get softer, note by note.

This is dynamic change is abrupt. There is a crescendo which leads to a piano.

Dynamics on the Piano

Trying to play dynamics on the piano is a matter of how fast and firmly you press down a key. Quicker and firmer means a louder note, while a quieter note is considerably slower and softer.

Over the years of playing and recitals, one thing I’ve noticed is that some people tend to lean more quietly, and some people tend to play loudly. Where you fall on this spectrum is good to know because you can work on your weaker area.

For instance, I tend to be a heavy-handed player. I have a hard time with the pianos, but I can play fortissimos easily. That’s why I remember exactly to hold back when I’m playing and find greater depth and range in the quieter volumes.

Experiment with the way you play keys on the piano and practice! If there was one thing you should know, practice makes perfect.

On the Flute

For me, dynamics on the flute can be difficult. I tend to blow harder and then run out of air. Playing softer gives me an airy tone, which is bad and you do not want.

Practicing how to blow softer and harder on the flute is something that also comes with practice and experimentation.

A tip I use for playing softer while still maintaining a good tone is to make a “peu” sound instead of the usual “too” and “poo” sounds.

Dynamics is one of those things you need to practice and experiment. Mastering it comes with practice and hard work, like any other creative process.

Experiment, practice, and most importantly, have fun!

All About Piano Exams

When I started playing the piano, I had no idea there was something called “piano exams”. I also didn’t know that you could earn certificates that you can use for the future!

From what I learned all these years of playing the piano, the most important thing about playing an instrument is that takes time and practice. Therefore, why not convert that hard work into real things that can help you later in life?

I have taken many exams for piano, spanning from harmony to practical. I had a good experience with piano exams, and hopefully, my experience will encourage you to take them too!

The Royal Conservatory of Music

The Royal Conservatory of Music is a Canadian music education institution that runs most of the exams in Canada, although they do have exams in the United States. The short form for The Royal Conservatory of Music is RCM.

The RCM logo.

“RCM is one of the largest and most respected music education institutions in the world, providing the definitive standard of excellence in curriculum design, assessment, performance training, teacher certification and arts-based social programs.”

The Royal Conservatory of Music

There are assigned levels based on skill in the RCM programs. It starts at Preparatory A, following levels 1-10, and all the way to the Associate Diploma of The Royal Conservatory of Music, aka ARCT. (Teachers)

RCM provides exams for every level, even for Preparatory A! From my experience, however, I believe that students should start participating in exams at level 5 at the latest.

The RCM certificate program gives out certificates to students who have completed all the required exams for their level. For e.g, when I was in level 8, I had to do two exams. A practical and a written theory exam.

Each grade level comes with two music books, a repertoire book, and a studies/etudes book (songs designed to build some sort of technical ability). The repertoire book is divided into sections based on time period, and when you do an exam, you’re expected to play a piece from each time period, as well as a couple etudes.

My level 9 repertoire and etude books.

Exams

Usually, when people hear the word “exam”, they freak out. Piano exams are signs of achievement and perseverance. Hard work turns into certificates and sometimes medals!

There are three main types of exams. Practical, theory/harmony, and history.

Practical

In a practical exam, you need to play a certain amount of songs, which is indicated in the curriculum/syllabus. You perform on your exam date in front of an examiner, who marks your playing, skills and technique.

The C Major scale I played at my first exam!

In addition, each level requires ear training and technique(scales). This is so the student is a well-rounded musician.

Ear training is identifying intervals and chords you hear by ear a few times and playing back a melody you hear.

For technique, you need to learn certain scales, arpeggios, and chords.

I know this seems like a lot but once you get your certificate, the feeling of pride and fulfillment will be something you would never forget!

My ear training book for level 10. (top)

Theory/Harmony

As you go up the levels, higher levels such as level 5-ARCT require not only the practical exam but the theory or harmony exam.

This exam tests your knowledge of music theory, which is scales, notes, keys, etc. It is mainly the rules of music.

I personally didn’t like theory exams, but once you get it done and over with, you get your certificates! Plus, learning theory has helped my playing tremendously.

My harmony and theory books!

History

For levels 9-ARCT, the program requires students at those levels must take a history exam in order to receive their certificates.

For my history exams, they test knowledge of previous historical and monumental songs and composers. This gives students an insight into what composers did to make their songs so “great”.

I personally loved studying this because I am interested in history and how music came to be.

My history book for level 10.

Benefits of Taking the Exams

  • Earn extra credit in high school! – Earning extra credit in high school is definitely an advantage because if you completed levels 7 and 8, you can get extra credit! Therefore, instead of having 2 spares in your high school career, you can have 3 or 4!
  • Be a well-rounded musician – exams require tests like ear training and technique, which makes students better musicians in general!
  • Achievement – Completing an exam is something musicians look up to!
  • Open doors – if you want to become a private music teacher, this program allows you to be certified! This will help you lure in students and it will make you trustworthy.
One of my certificates for Level 9! This is for the practical exam.

Things to do Before an Exam

For my first practical exam, I was freaking out. I learned that if you are anxious, you will do worse because of your nerves. I suggest doing the following:

  • Do not drink or eat any caffeinated products. It will make you more anxious!
  • Relax! Being anxious will cause you to do worse.
  • Do not practice before an exam as it will also add to the stress.
  • Get a good night’s sleep. Your brain needs rest!

I hope this blog has taught you many things about piano exams! I have had a good experience with exams and I definitely do not regret taking exams. Hopefully, you will participate in the RCM program too! But, remember to have fun with your music!

Playing Your First Note on the Flute

I started learning how to play the flute last February in music class. I had a little bit of difficulty because it is a woodwind instrument, meaning you have to use your air to make a sound.

The Woodwind Family. La Phil Store. 2019. http://www.laphilstore.com/musical-instrument-ornaments-woodwind-family.html

I was worn out after playing the flute because I was not used to the amount of air needed to play the flute. My head hurt and sometimes I couldn’t play a single note because I was blowing into the flute incorrectly.

I had the guidance of my music teacher when I was learning how to play my first note on the flute. I hope this blog will guide you and give you some useful tips!

Assembling the Flute

The head joint.

Before you blow into the flute, you need to know how to assemble the instrument. There is a head joint, which is the second smallest part of the instrument, with a hole. The hole is called the embouchure hole. This is the part you use to blow into.

The longest piece is called the body. The body has many buttons and is the middle of the flute. When putting the body and the head joint together, the embouchure hole should be aligned with the buttons on the body.

The body and head joint attached.

The last piece, the foot joint, is the shortest and smallest part of the flute. This part goes on the bottom of the flute, and has a thin rod connected to the joint. The “thin rod” should be aligned with the middle of the buttons on the body.

Now, you should have assembled your flute correctly. Now you use this procedure every time you use your instrument because when you are done playing the instrument, you disassemble the flute and put it back into the case.

The foot joint assembled with the body.

Playing the Note

Take off the body and foot joint because it takes more air to play through the flute than just the head joint. You should be left with your head joint. Your mouth must blow and be shaped in a certain way to have the correct tone. It should sound full and not airy.

Raise the head joint to your lips from the direction of your chin. The embouchure hole should be facing upwards. The piece should be held horizontally.

Place your bottom lip on the lip plate. The closed side of the head joint should be facing left, while the open side (where you connect the body) should be facing right.

Cover the right side (open side) with your right hand. If you don’t, no matter what kind of mouth position you have, it will not have the correct tone. You will know because it will only sound like air.

The embouchure hole should be in the middle of your lip. The lip plate should rest gently in the place where your lip and chin meet. Your bottom lip should be covering part of the hole in the flute, but be sure it is not too much.

Then, close the ends of your lips so your mouth has a small oval shaped hole in the middle of your lips. Do not pucker your lips and do not make it taut. It should be relaxed, in a normal position with the ends closed.

Next, blow into the hole. I usually blow using a “too” or “poo” sound. Remember, it should not sound airy at all. Aim your air downwards and across the embouchure hole. This comes with practice; the more you play the flute, the easier it is to blow into it.

Experiment with your blowing/breath and mouth positions. Find your so-called “sweet spot” and make sure it sounds clear.

I hope you learned something about playing on the flute! The flute is not like the recorder and is a harder instrument than you think. You play sideways and the flute has buttons, not holes. Remember to practice and stop when you feel light-headed!

Playing Your First Note on the Piano

When I was eight years old, I told my father that I wanted to play the piano. I would pretend to move my fingers back and forth on the dinner table, pretending it was a keyboard.

When I was nine, I actually got my fingers on the instrument and was so excited!

Turns out, I didn’t know how to play at first. You are probably reading this because you just received your first piano or keyboard!

The piano is a simpler instrument for beginners because most music theory relates back to the piano. The piano can play as a solo instrument or accompaniment!

My theory books that relate back to piano.

For beginners, the piano should be a solo instrument because you have not learned the basics yet! Playing your first note should be easy as most people would just have to press a button/key on the keyboard. But it is not that simple, so I created a step by step procedure of what you should know before and when you play the piano!

Learn the Finger Numbers

The piano has many keys, which have different pitches. Depending on which piano you have, you can have up to 88 keys!

Obviously, you only have 10 fingers in total. Therefore, you do not have each finger designated for each key. This is very important to know because when we play songs, we want to use the most comfortable and easiest fingerings as possible.

We use finger numbers so we know which finger to use to play each note! This is called fingering.

The thumbs on both hands are called fingers number 1. The index fingers are fingers number 2. The middle fingers are called fingers number 3. The ring fingers are called fingers number 4. The last fingers, the pinkies, are fingers number 5.

Playing Middle C

When you look at your piano, you can see that it has both white and black keys. You might have noticed that there is a pattern on the keyboard.

The keys are arranged so it has two main groups of black keys. There is a group of two black keys and the other group has three black keys. Then, the pattern repeats itself.

It is important to know the “guide note”, middle C, as it will help later with reading music. It is also the first note of the C Major scale, which is one of the first scales you learn as a beginner.

Something I learned in music class as a kid was the “do re me fa sol la ti do” scale. Over the years, I realized Middle C is “do” in the “do re mi fa sol la ti do” scale. Middle C is at the middle of the keyboard, beside the group of two black notes, on the left.

Now play the note five times using all your five fingers in your right hand, starting from finger number one.

Holding the Note

One question I asked myself when I was a beginner was:

How long do you hold that note?

You usually should hold it for one beat. To start, a beat is usually at the pace of a heartbeat. One beat is called a quarter note. There are different rhythms in music, and a quarter note is only one of them.

A quarter note.

I hope this article helped you play and learn some things about the piano! I wish you good luck on your musical journey!